Showing posts with label cook something. Show all posts

Wednesday, February 8, 2012

A New Baby


I've been MIA over here on this blog.

What have I been up to

Well- I had a baby (She is already 5 months old and the most adorable thing in the whole wide world)
Moved to a new state (California to be exact. The verdict is not out yet on the state or the move)
and wrote a cook book. Crock Pot of course, what else is there?


My husband laughed it too me so long to complete this.
He didn't think all the witty comments and jokes were necessarily ingredients in a crock pot meal.
He was very wrong.

You can get your downloadable copy here

Saturday, September 10, 2011

Pudding Pops- Keeping Summer Going


I'm just starting to feel like myself again.
And it turns out I totally missed summer.
Well there is no reason just because it is fall, I can't still serve summer-ish treats.
After all, I missed summer being pregnant and nursing a newborn round the clock.

Today we tried out these pudding pops I've been seeing around the blog world

Simple as can be really.

Things you need.
-Your favorite flavors of instant pudding. 3 packages of pudding made 8 pops.
-Small sized plastic cups
-Craft sticks

Then you just make your pudding. I used chocolate, butterscotch and vanilla, and layer it however you like into the cups. Don't wait for the pudding to set up, just mix it, and start layering. Stick in a craft stick and let them freeze for five or so house.
Then just pull them out of the cups (make sure they are good and frozen otherwise you'll just be pulling sticks out), and serve them up.


These were a big hit with the adults in this house, even more so than the kids.

I have about 4 more in my freezer even after serving them tonight and I intend to eat them through out the week and pretend like it is summer 'round here just for a few more days.

Thursday, June 16, 2011

Two Pies for Dinner

We spent the weekend on my sister-in-laws Idaho farm.
The kids had a blast feeding the animals, driving tractor, and most of all running around with 6 cousins.

Other than good memories :)
we came home too many brown farm fresh eggs.  36 of them to be exact.

And in an effort to use some of them up I made quiche for dinner.
I found this recipe here on allrecipes.com. for a Spinach Quiche.
It had received 4.5 stars.
And other than a minor adjustment.... the adding of 5 more eggs, it was created for my family tonight.
And the recipe was actually enough for two pies. I find that is almost always the case with pie recipes.

It turned out.
or so I thought.
Until we went to eat it and I saw my husband not eating. nor my daughter.
I asked if it was alright. I was on my second slice.

They went ahead and made themselves turkey sandwiches instead.
It is the 1st meal I have prepared for my husband in eight years that he didn't end up eating.
It is mostly funny.

I decided with the other pie crust and left over cream, I would make some dessert after we spent the evening working in the yard.
It was reviewed by the family much more positively than the Spinach Quiche.

Nutella Pie.

I found that recipe here.

I changed it up a bit.
here are the directions.

NUTELLA PIE


1 9-inch pie crust, unbaked
1 box brownie mix (or homemade)
4 ounces cream cheese, softened
1/2 cup semi- sweet chocolate chips
1/2 pint heavy whipping cream
2 tablespoons sugar
1 teaspoon vanilla

Preheat oven to 350 degrees. Make brownie batter as directed on the box and pour into a prepared pie crust. Bake for 35-45 minutes, or until a toothpick comes out clean. Let cool completely.
Using a mixer, whip the cream, sugar and vanilla until stiff peaks form. Transfer to another bowl and set aside.
In the same mixer bowl, mix Nutella and cream cheese until well combined. Spoon in 1/3 of the whipped cream and gently fold in. Repeat with remaining whipped cream- be careful not to stir- it won’t be as light and fluffy. Chill the mousse until the brownie layer is completely cooled.
When the pie is cooled, spread the Nutella mousse evenly over the brownie layer. Drizzle with melted semi sweet chocolate. 

Tuesday, May 17, 2011

Nutella Muffins

image from here


I found this recipe over on Pinterest.

I knew I would make them.  My kids love Nutella.  They ask for Chocolate on their sandwiches sometimes.  They think this Nutella makes a chocolate sandwich.  Well it pretty much does.

These muffins gave us a new use for the Hazelnut spread and a delicious breakfast.


Preheat oven to 325.
Makes a dozen.

1/4 cup butter, at room temperature
1/4 cup canola or mild vegetable oil
3/4 cup sugar
3 large eggs
1 tsp. vanilla
1 3/4 cup all purpose flour
2 tsp. baking powder
1/4 tsp. salt
1/4-1/2 cup Nutella, at room temperature


Beat butter, oil, sugar, eggs and vanilla.
Mix dry ingredients together
Spoon mixture into muffin tin- greased or lined.
Place 1 tablespoon of Nutella on top, swirl in with  bamboo skewer or candy making stick.

Bake for 25 minutes.

Thursday, February 17, 2011

Enchillada Soup- Gluten Free, but Yummy For Everyone

Enchillada Soup- Gluten Free

1 can Swanson (gluten free) chicken broth
1/2 can La Victoria (gluten free) green enchillada sauce
1/2 chopped onion
3 chicken breasts, cooked and chopped
3 cloves garlic pressed
1/2 teas. cumin
1/2 teas. dried oregano
1 1/2 cup sour cream
1 can corn
1 can black beans
2 cans white beans

1 can diced tomatoes- optional

As always my directions are.....
Throw everything in the crock pot on low for a few hours.
Top with cheese, avocados, more sour cream, even gluten free tortilla chip crumbs if you've got them.

It is spicy, creamy and warm.
His Majesty says it is like salsa soup.... in a good way.
I made it for lunch hoping we could eat it for dinner too, and I think I may need to make something else because we've almost emptied the pot.


I shared in my last post that our family is attempting to be a gluten free household.
We are coming to the end of two weeks now, and my mind has finally adjusted to be able to cook gluten free without a recipe. It has taken me a while to figure out what I can and can't use. Turns out gluten is in everything!
One of the biggest challenges that we have found so far is finding dishes that are satisfying to us adults in the family, especially with one of those adults (me) being a pregnant women who is always starving.
I came up with this for lunch today and everyone enjoyed, most especially the adults.
(I may or may not have eaten 4 bowls!)
I thought I would post my recipe since I hadn't seen anything like it on some of the gluten free websites I've been visiting and I am sure there are other families searching for gluten free choices everyone wants to eat.
I must admit that when I started I was actually trying to replicate my sisters white chicken chili, but didn't have her recipe, nor all the ingredients I remembered eating in hers.
It didn't turn out to really be white chicken chili, but it did turn out delicious.


Enjoy!

Saturday, November 20, 2010

Tradition and Recipe Link Up

Let me tell you about my new Raspberry Truffle Pie Reciepe
a couple of traditions we have around this house
Then please tell me about yours by linking up at the bottom.


How to Make a Raspberry Truffle Pie

...because I promise you want to.

Step 1:  Let your three year old daughter help you sew an apron because it is actually kid date night, and this is what she has chosen to do..."sew like a mom"
Kid Date Night is a tradition we have on Thursday every month we each take a kid and do something they want to do  for one on one time.  Kate got sewing and cooking- but she has been begging me to make and apron for her that is her size.  Sam and Dad went and drove the tractor around outside together.

Step 2:  Melt 1  large bar (10 squares ) of Ghiradelli Semi Sweet Chocolate finely chopped with 1 cup of Whipping Cream in the microwave for 60 seconds.  Stir and microwave additional 20 seconds until smooth.
Pour in ready made chocolate Oreo pie crust.  Refrigerate for at least 4 hours.
Step 3:  One the truffle bottom has set up (4 hours or so later)  layer on top 2 cups of raspberries.  For your shopping help that is almost 2 of the small cartons they sell at the store.
Here Kate shows you what that step looks like.

Step 4:  In the Microwave for 20 seconds heat, 6 tablespoons seedless raspberry preserves, 1 tablespoon sugar, and 1 tablespoon of water.
Here Kate shows you what this step looks like.
Take and intermission from pie making because Kate has decided we should also sew a Christmas purse for her.  Okay Kate, it is your Date Night.
Wrap silverware with "EAT-PIE" labels for annual pre-Thanksgiving Pie Palooza.
This is another tradition we have. The weekend before Thanksgiving we invite all the neighbors over.  Each family brings their favorite pie to share.  A prize for the best pie is awarded.  Everyone has their fill of pie before they are too full to eat all the delicious pie on Thanksgiving Day.  We throw a lot of parties, but this is one of my favorites because it is so low key and easy, and everyone loves it.

Step 5:  Top with homemade whipped cream and shaved chocolate.
I beat 1 cup of whipping cream, 2 tablespoons of sugar and a tsp of vanilla until light and fluffy (and delicious) for mine, then topped with more Ghiradelli Choclate bits.


Okay now it is your turn to share.
What are some holiday recipes or traditions your family has?
Be sure to link back to the post so everyone can see all the fun.

Tuesday, October 26, 2010

Everybody's Favorite Spinach Dip


Once I was asked to bring an appetizer to a fancy party.
I called my Mom and asked her for this recipe.
Partly because I remembered it being delicious, and partly because I was all of 21 and could only think of 2 or 3 appetizers.
I brought it to the party, and within minutes of my arrival it was entirely gone.  The 5 couples present had devoured it, including the bread bowl which I had hollowed out and was serving the dip in.
After it was such a hit I started serving it a lot.  At showers I threw, other parties of my own, and those I was invited to.
I have had several hostesses ask me to make and bring it to their party.
Including today.
We are headed to a Mom and Kid Halloween Party- and my dip was requested again.

It is always such a hit, but also super easy.

Here is how to make your own.

Simple Spinach Dip
1 cup Mayo
1 cup Sour Cream
1 package Leek Soup mix from Knor's
1-2 cups chopped spinach.

Mix all together and let refrigerate for 2 hours before serving.
Serve it with your favorite artisan bread or sourdough.
I usually serve it in a bread bowl for "prettiness".


Tuesday, October 19, 2010

Spooky Food

Remember how I love Halloween and everything spooky?
Here is our Halloween dinner from last year.


Blood Soup  and Eyeballs (Tomato Soup with mozzarella)
Muumies (Hot dogs in dough)
Slime Monsters (Jello)
Witch Fingers (Carrots with almonds)
Ghosts (Nutter Butters dipped in chocolate)

I continue to make scary food this year.
 Eyeball punch (Pomegranate Crystal Light and Sprite with ping pong balls painted like eyes)


 7 Body parts layered dip.
You could also bury a skeleton at the bottom of your dip and call it Gravediggers Dip.
 A FrankenBride Cake- my sister in laws work.
 Skeleton Cookies (oreos dipped and decorated)
Skeleton Cupcakes (Red Velvet Cake frosted and decorated)

That is all so far... but it is not Halloween yet.  Much more to come I'm sure.

Linking Up
http://www.remodelaholic.com/2010/10/recipe-swap-party.html

Monday, October 18, 2010

Easiest Pumpkin Bread Ever

Don't mind that mine actually looks like a cake.  I just baked mine that way because I thought it would be prettier.  It is actually more like bread- but it does have a cake base.... you'll see.

Ingredients-
1 can of pumpkin
1 spice cake mix
2 eggs
1/3 cup oil
1 cup of water

Directions-
Beat all ingredients together.  Cook in greased pan for 30-45 minutes.

* You can add chocolate chips if that is how you roll, or for a more sophisticated feel, grate a dark chocolate and white chocolate bar and sprinkle on top.

Linking up

Wednesday, October 6, 2010

Handmade Ganache Truffles


Last week I was watching some morning cooking show on PBS with my sister-in-laws.  We were on vacation.  Some ideas with ganache were shown.  We all decided we had to get to trying handcrafting candies out of ganache.  Because who doesn't want to serve their guests these?  I'm hard to impress when it comes to desserts- but these would impress even me.

You see, fancy desserts are really easy to do.  Time consuming, but easy.
Step 1:    Chop 9 oz of your favorite bittersweet chocolate.  
I used a Ghiradelli.

Step 2:   Bring 1 cup of heavy whipping cream to a boil.  
Let it boil for three seconds.

Step 3:  Pour boiling cream into chopped chocolate.  
Whisk until smooth.  Let chill in freezer for 30- 50 minutes.

Step 4:  Scoop with melon baller.  
Place on wax paper.  
Return to freezer for 30 minutes.

Step 5:  Dip in your favorite chocolate and adorn with toppings.
Be aware that the ganache will melt in the melted dipping chocolate.  I would only take two or three our at a time to dip.

See none of that was hard.  It just took a while.
It does cost about $6.00 to make 12 of these.  But you only need to eat 1 so it works out.

I can't believe I haven't been usuing ganache more.  I think next I will try frosting a cake with it or pouring it in a candy mold.

Monday, September 6, 2010

I grew a Garden.... Now What?


Growing a garden seems a practical idea.
I mean who doesn't want fresh organic veggies out their backdoor?

Only crazies.

But sometimes I struggle to come up with things to use all those veggies for.
We can only eat so many raw and in salad after all.

Some of the things we have been making with all our home grown goodness include

Herb Garden  Chicken Pasata
Zucchini Lemon Muffins
Assorted Sauteed Veggies
Garden Fresh Pico

and my newest dish on the list are GARDEN FRESH FAJITAS.

Easy as 1.2.3.. okay 4.

1.Saute peppers and onions.
2.Grill chicken or steak
3.Add a bit of lemon zest, chili powder and pepper and salt.

4.Wrap in a tortilla and top with cheese, salsa and sour cream

I think I will try these all veggie fajitas this week.  Zucchini and Squash are a main ingredient.

What have you been making with all your veggies?

Thursday, August 26, 2010

Herb Garden Dinner

Time to use some herbs from the garden to make dinner!

Grill 4 chicken breasts
Add in tomatoes
Olives
2-6 Basil Leaves
2 pinches of Fresh Thyme


YUM!

Pesto Sauce

Food process (or use your blender like I do)
3 cups of Basil Leaves
4 Cloves of Garlic
1/2 cup Parmesan Cheese
1 cup olive oil
A pinch of salt and pepper
1/2 cup chopped walnuts if you please


Combine and mix Pesto Sauce over Penne noodles. Top with chicken mix!


Friday, August 20, 2010

What to do with all the Zucchini


Every year when harvest time comes,
I realize that one or two zucchini plants would have been sufficient.

But each year at planting time- I convince myself that four or more plants are needed.


And then I have an overload of squash, and commit myself to only planting one or two zucchini seeds....
they cycle continues :(


Here is my recipe for Zucchini Muffins.


My kids seem to eat these better than the bread.
One average size zucchini is needed for the recipe- which makes about 16 large muffins.


ZUCCHINI MUFFINS

1 1/3 cup shredded zucchini
3 eggs
1 cup sugar
2/3 cup oil
2 cups flour
3/4 teaspoon baking powder
3/4 teaspoon baking soda
3/4 teaspoon salt
3/4 teaspoon cinnamon
3/4 teaspoon lemon juice


Perhaps you have noticed that I like to make recipes easy by making as many ingredients the same proportion as possible.
I just like being able to make a recipe without having to look at it and this makes it easier.


Preheat oven to 350 degrees.
Prep pans or muffin pan with non stick spray


Beat eggs and sugar for 10 minutes.
Beat in lemon juice and oil and zucchini.
(I love shredding squash, it is just too easy)
Mix dry ingredients separately.
Then add to wet ingredients.


Fill muffin pan 2/3 full.
Bake for 20 minutes.

Now what should I do with the other six ripe zucchini???


Friday, July 9, 2010

Garden Fresh Pico


Nothing seems more delicious than Fresh Pico de Gallo made from things in my garden to me on a hot summer afternoon.
I'm not sure why this deliciousness is named after the beak of a rooster- but I don't really care.
We are currently only harvesting peas, green onions and radish from our high mountain dessert plot. But I had to do something with the green onions as they were taking over.
Plus I really don't need an excuse to make this- though all that chopping is certainly a labor of love.
For those of you who have some how reached adulthood and not discovered the difference between salsa and pico de gallo, let me clue you in.... Pico is not as spicy, much chunkier and very fresh, I don't like salsa on chips, but I can eat Pico with a spoon.

And please don't use a magic bullet or blender or something to do the chopping- it just won't turn out as good

2-4 tomatoes depending on size
3/4 white onion
4-8 springs cilantro
2-4 green onions
1/2 green bell pepper
1/2 red bell pepper
1/3 fresh jalapeno seeded- this is optional.
1/2 teaspoon garlic powder or pressed garlic
1/4 teaspoon salt
1/4 teaspoon pepper
1-2 fresh squeezed lime

Just dice and slice everything up and stir it all together.

Fruits and Veggies cut up and thrown together never tasted so good.
I have every intention of making lots more when my tomatoes grow up and make their way to the kitchen.

Wednesday, July 7, 2010

Oreo Suckers

Remember how half the dessert I make are covered in chocolate and on a stick.
So I work with what I have. (shoulder shrug)
Which is usually a lot of dipping chocolate and candy sticks.

I had seen something like this around.
Oreos do happen to be one of my favorite treats.
So much so that my husband usually buys me a box or two for Valentines Day instead of flowers and chocolates.

So of course I wanted to try to make Oreo Suckers for myself.
To start open all your Oreos.
Twist the tops off I mean.
I hope you have had some practice at this because it is not as easy as the commercial makes it seem.
Some might break- you can go ahead and eat those they are of no use to the project.

Next place your candy stick in the cream center like you see above. You want to push the stick through the cream so it is laying on cookie.
Next take a bit of melted chocolate and dab it over the stick. Then put the cookie back together
This helps the stick stay in place and the top of the cookie stick back on.
Let these dry for about five minutes.
Otherwise the top falls of in the chocolate when you dip and you have to eat all of them as well.
Now you are ready for dipping.
Like always dip in chocolate using the method you are most comfortable with.
For me that is my boyfriend Almond Bark coating.
I stick it in a microwave safe bowl for 30 seconds, stir and in for another 30-45.
Cover the cookie completely then let it set and cool on chocolate coatings best friend wax paper.
You can decorate with more chocolate drizzle, sprinkles or nothing at all.

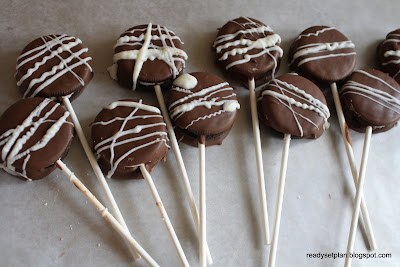
Now I am sure you can find an adorable way to package them.
But these little babies are just for us to eat.

I wasn't sure there was a way to improve on the OREO.
Turns out I was wrong.
Covering them in more chocolate and putting them on a cute stick makes them somehow even more delicious and addicting.

Tuesday, June 29, 2010

Vegetable Carnival


Some adorable people I know have started a little blog (and big project) called

VEGETABLE CARNIVAL

They have decided as a family to improve their health by what they eat.
They are funny.
They are inspirational.
They have a six week plan that includes two lbs or more in raw and cooked veggies and eating no meat, sugar, or added fat like vegetable oil.

Think Super Size Me- but the opposite.

Coincidentally they began their veggie overload the same day I decided to not eat sugar for 1 month.
We all have visions for better health- these two are just real go getters.

I can't wait to see how their new eating lifestyle goes and am excited to follow along.
You can follow them too here.

Friday, June 11, 2010

Fastest Cookies in the West


Cake Mix Cookies are fast and delicious.
I often call them 10 Minute cookies because that is literally the time you need between when you decide you need them and when you decided to serve them.
Well not literally- maybe 12 mintues but "10 minute cookies" has a better ring to it.

Minute 1- Preheat oven to 375. Spray cookie sheet with non stick spray
Minute 2- Collect ingredients from pantry
Minute 3- Mix ingredients together
Minute 4- Roll dough into balls and place on cookie sheet
Minute 5- Place in oven for 8 minutes.
Minute-12- Remove from oven, cool and serve.

Here are two of my families favorite cake mix cookies though the options are endless.


CAKE MIX SNICKERDOODLES

1 yellow cake mix
1/3 cup veg oil
2 eggs
1 tsp vanilla

1 cup sugar
2 tbs cinnamon

Mix 1st four ingredients together until relatively smooth
Form small dough balls
Mix sugar and cinnamon in separate bowl.
Roll dough balls in sugar/ cinnamon mixture
Place on cookie sheet.
Cook for 8 minutes at 375.


DOUBLE CHOCOLATE CAKE MIX COOKIES


1 chocolate cake mix
2 eggs
1/3 cup vegetable oil
1/2 package chocolate chips

Mix first three ingredients together until relatively smooth.
Stir in chocolate chips.
Roll into small dough balls and place on cookie sheet
Bake for 8 minutes at 375


It is so simple even a three year old can do it!


Make snack time even simpler by putting cookies in individual zip lock bags and in the freezer. They save fairly well.
Throw a pack in your kids lunch and they will be nice a soft and perfect for snacking at lunch time.
Related Posts with Thumbnails